Swin Transformer总结

Swin Transformer的提出让Transformer代替CNN作为计算机视觉领域多类下游任务的特征提取骨干网络,下文主要记录Swin Transformer的基本结构。 这里是官方代码链接[1]和论文链接[2]

Swin Transformer的提出动机

Transformer在NLP领域大展身手,但将Transformer迁移到CV领域,会面临两个困难:

  1. 尺度问题:在一些CV任务中,比如目标检测问题,具有相同语义的实例由于尺度的问题,在图像中占据不同的像素规模,但目前基于Transformer的方法中,图像切片都是固定大小的。
  2. 计算复杂度:图像的特征张量展开成向量的方式计算自注意力这个过程,当图像分辨率稍大时,该过程的复杂度将变得难以忍受,因为此时的计算复杂度将与图像大小的平方成正比,这让Transformer在诸如语义分割的下游任务(需要像素级别的标签预测)中遇到困难。

为了解决上述问题,作者提出的Swin Transformer仅在局部窗口计算自注意力,并提出用Shifted windows得到特征的全局上下文信息(全局特征)。

网络结构

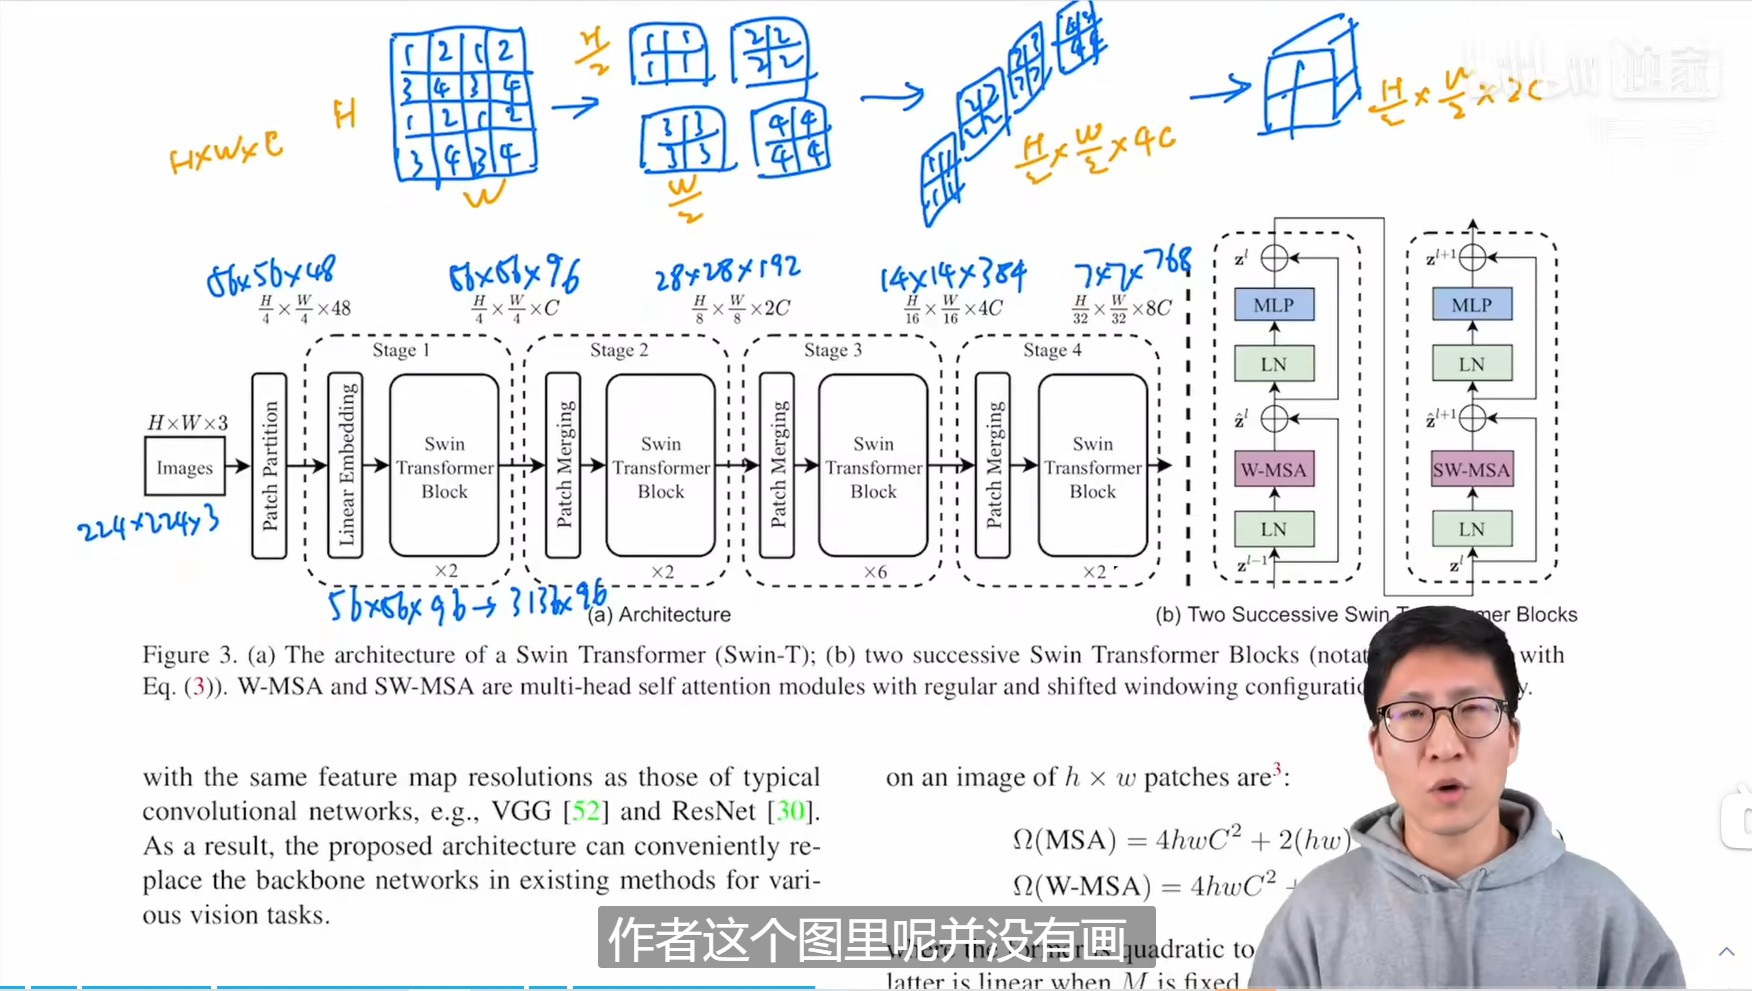
Swin Transformer(Swin-T)网络结构如下图:

swim_transformer_network.jpg◎ 图一 Swin Transformer (Swin-T) 的网络结构

假设网络输入图像尺寸是$H \times W \times 3$,经过Patch Partition模块后被分为互不重叠的patches,注意在论文中patch是最小的计算单元,一个patch区域的特征后续会被展开成一个向量用于计算自注意力。在论文中patch被设置为$4 \times 4$的像素方块,所以经过Patch Partition模块后的特征图维度是$\frac{H}{4} \times \frac{W}{4} \times 48$。网络后续部分被分成四个Stage,除了Stage1是Linear Embedding模块与Swin Transformer Block的组合,后续的Stage都是Patch MergingSwin Transformer Block的组合。Stage1中的linear embedding层将特征维度变换为$\frac{H}{4} \times \frac{W}{4} \times C$,Swin Transformer Block即论文提出的修改版本的Transformer模块,将在下文具体介绍。Patch Merging对特征图采用步长为2的等间隔采样,并将采样后的特征图在通道维度上合并,此时特征图的分辨率将降采样为原来的$\frac{1}{4}$,通道为从$C$提升为$4C$,并通过一个线性变换层转换为$2C$。

标准的Transformer由于需要计算全局自注意力,它的计算复杂度随着图像大小增长呈平方关系。为了解决计算复杂度的问题,论文提出让Swin Transformer Block只在一个区域(windows,论文将windows固定为7$\times$7个patch,patch是最小的计算单元)中计算自注意力。全局的MSA和基于窗口的MSA的计算复杂度如下所示(仅考虑乘法操作): 微信图片_20220411213809.jpg◎ 图二 MSA与W-MSA计算复杂度 然而这样的方式中只能得到局部注意力,论文的主要贡献点在于提出了Shifted windows 的操作,Swin Transformer Block总是两两组合的,每次运算都会包括在原始windows中计算自注意力,以及在Shifted windows中计算自注意力,所以看上图中的虚线框每个stage的Swin Transformer Block的数目都是偶数,这样得到的特征已经能得到较大的感受野,多次运行Swin Transformer Block后,最终的特征能得到全局的感受野。

两个Swin Transformer Block的组合方式如图一中(b) Two Successive Swin Transformer Blocks所示,W-MSA代表当前windows的多头自注意力网络,SW-MSA代表Shifted windows的多头自注意力网络。

至于为了解决尺度的问题,Swin Transformer引入Patch Merging操作,模拟CNN中的池化操作,经过Patch Merging后特征图的分辨率下降,但特征通道维数增加了,这与CNN的骨干网络的效果是一样的。Shifted windowsPatch Merging的操作会在下文介绍。

Shifted windows

Shifted windows的示意图如下:
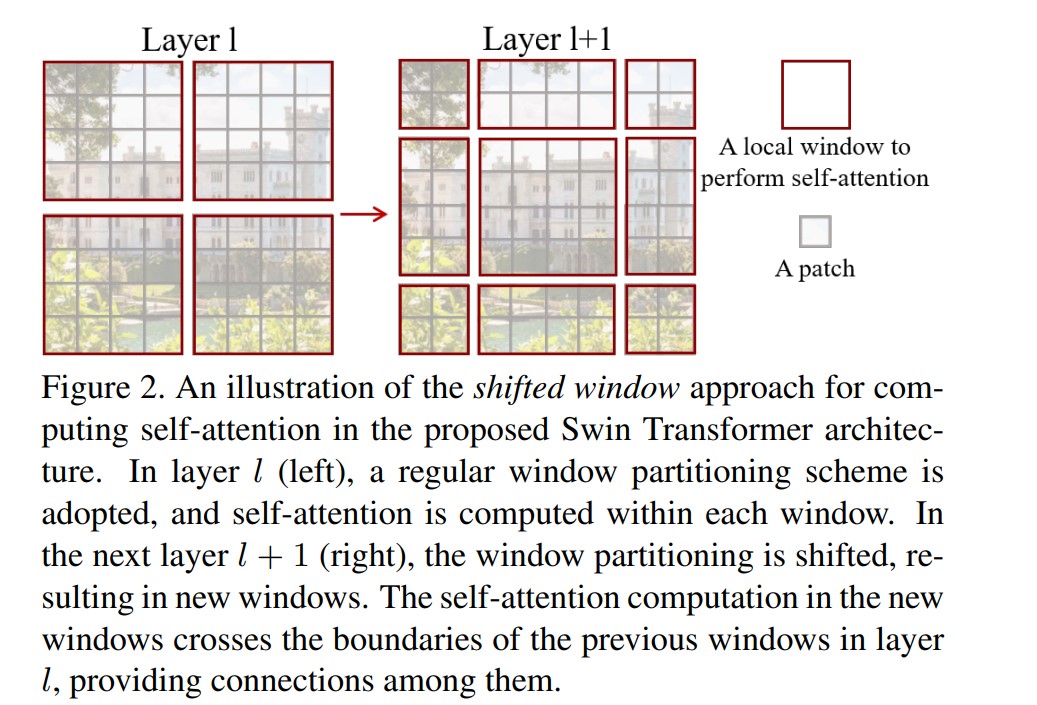
shift_windows.jpg◎ 图三 Shifted windows

在上图中,一个大小为$M \times M$($M$在论文里设定为7,如果特征图大小不能被$M$整除,则先零填充特征图)经过基础版本的Shifted windows操作后,4个windows会被分为9个windows,每个windows将分别计算自注意力,这样存在的问题是:由于每个windows并不是保持一样的大小,这给代码实现时并行化处理带来麻烦,降低了运算效率,论文中Shifted windows的实现巧妙地利用掩码(mask)的MSA层解决该问题,如下图所示:
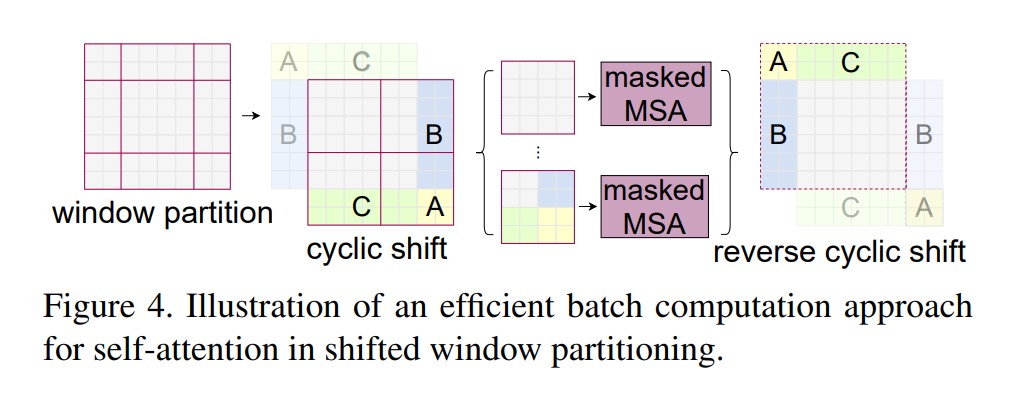
shifted_window1.jpg◎ 图四 Shifted windows的高效实现

从上图中看出,论文将9个windows重新填补成4个windows并做好标记(标记该张量原本来自哪里),然后对该4个windows计算W-MSA,但这样的操作会为本不应该计算注意力系数的向量之间也计算了注意力系数,因为重新填充后的窗口的向量很可能是不相关的。masked MSA的操作在重新填补的windows计算MSA时,为不应该计算注意力系数的区域填充一个很大的负数,这样MSA经过后续的softmax操作后,该区域将归零。这样,通过masked MSA的处理,虽然总的计算量提高了,但由于windows大小变的一致,硬件并行化实现反而然模型的运算效率提高了。masked MSA的计算示意图如下所示:
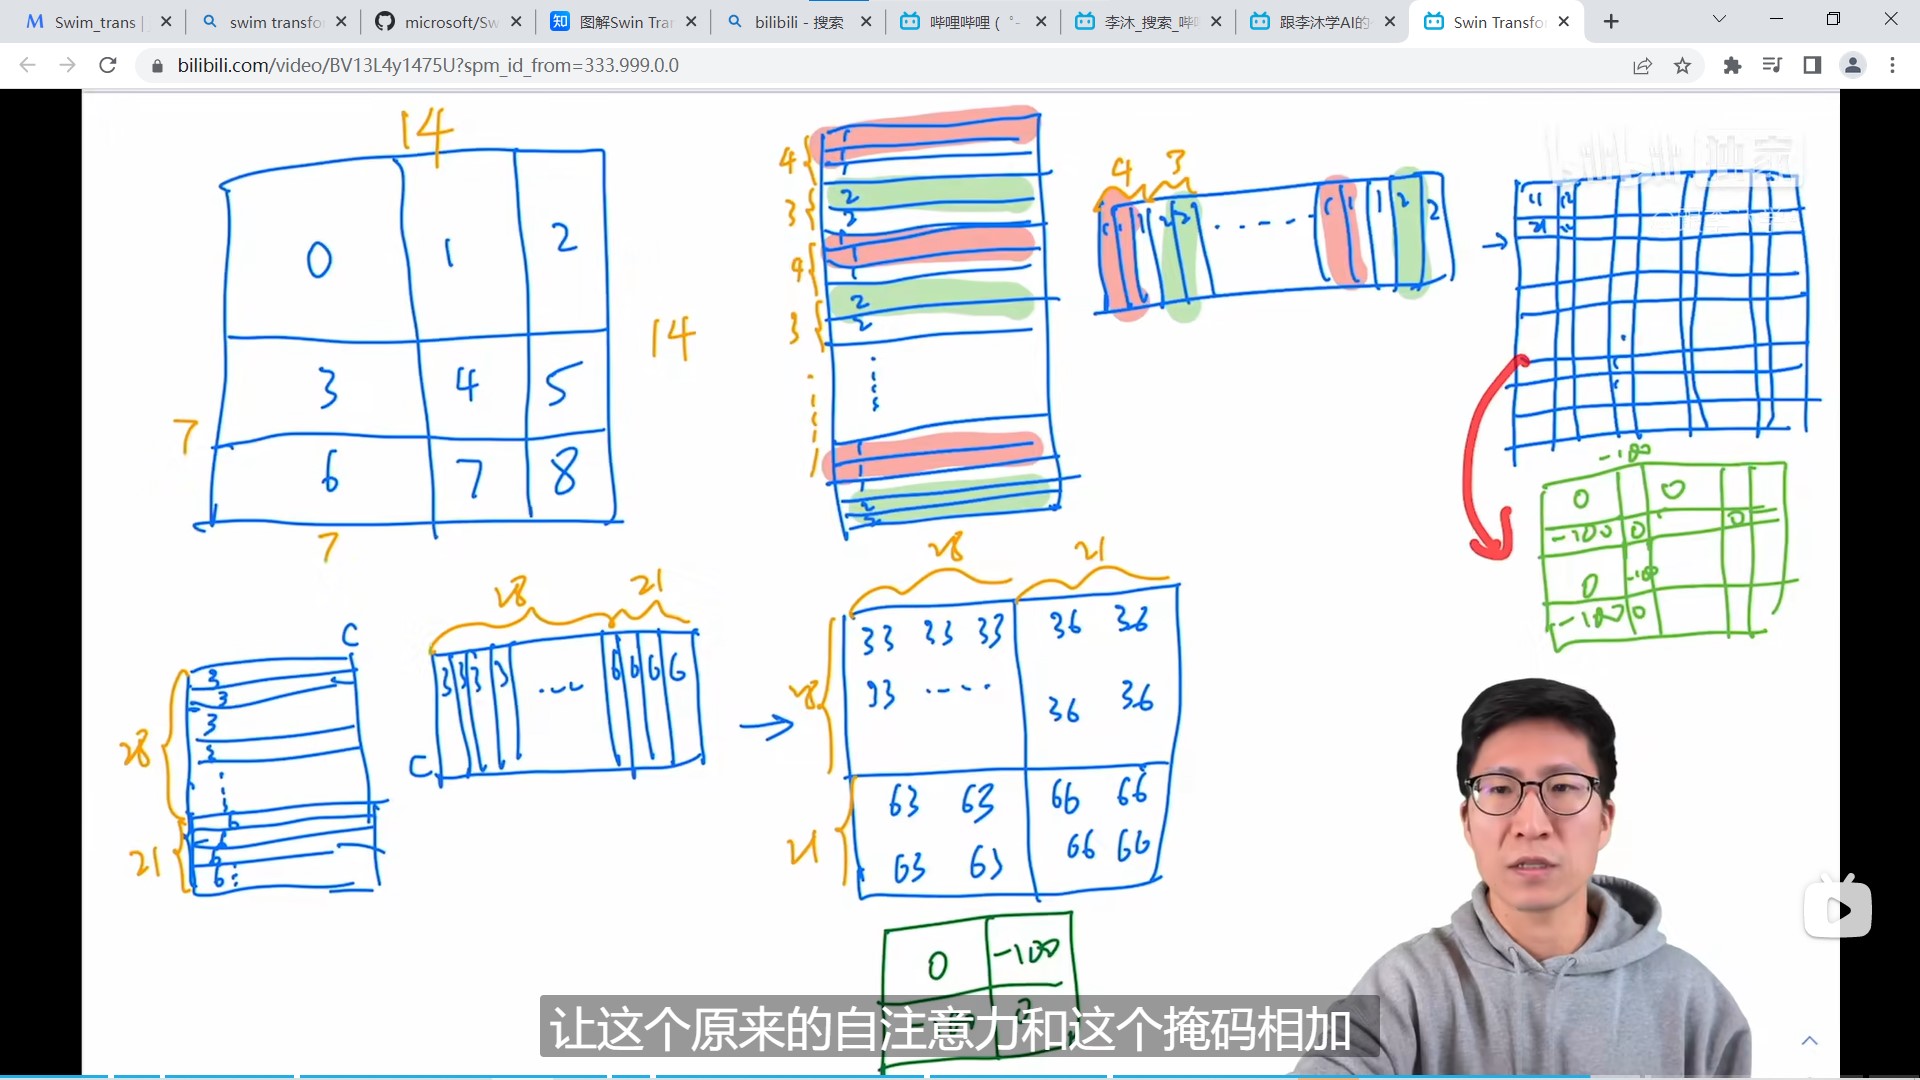
屏幕截图 2022-04-08 110633.jpg◎ 图五 masked MSA示意图

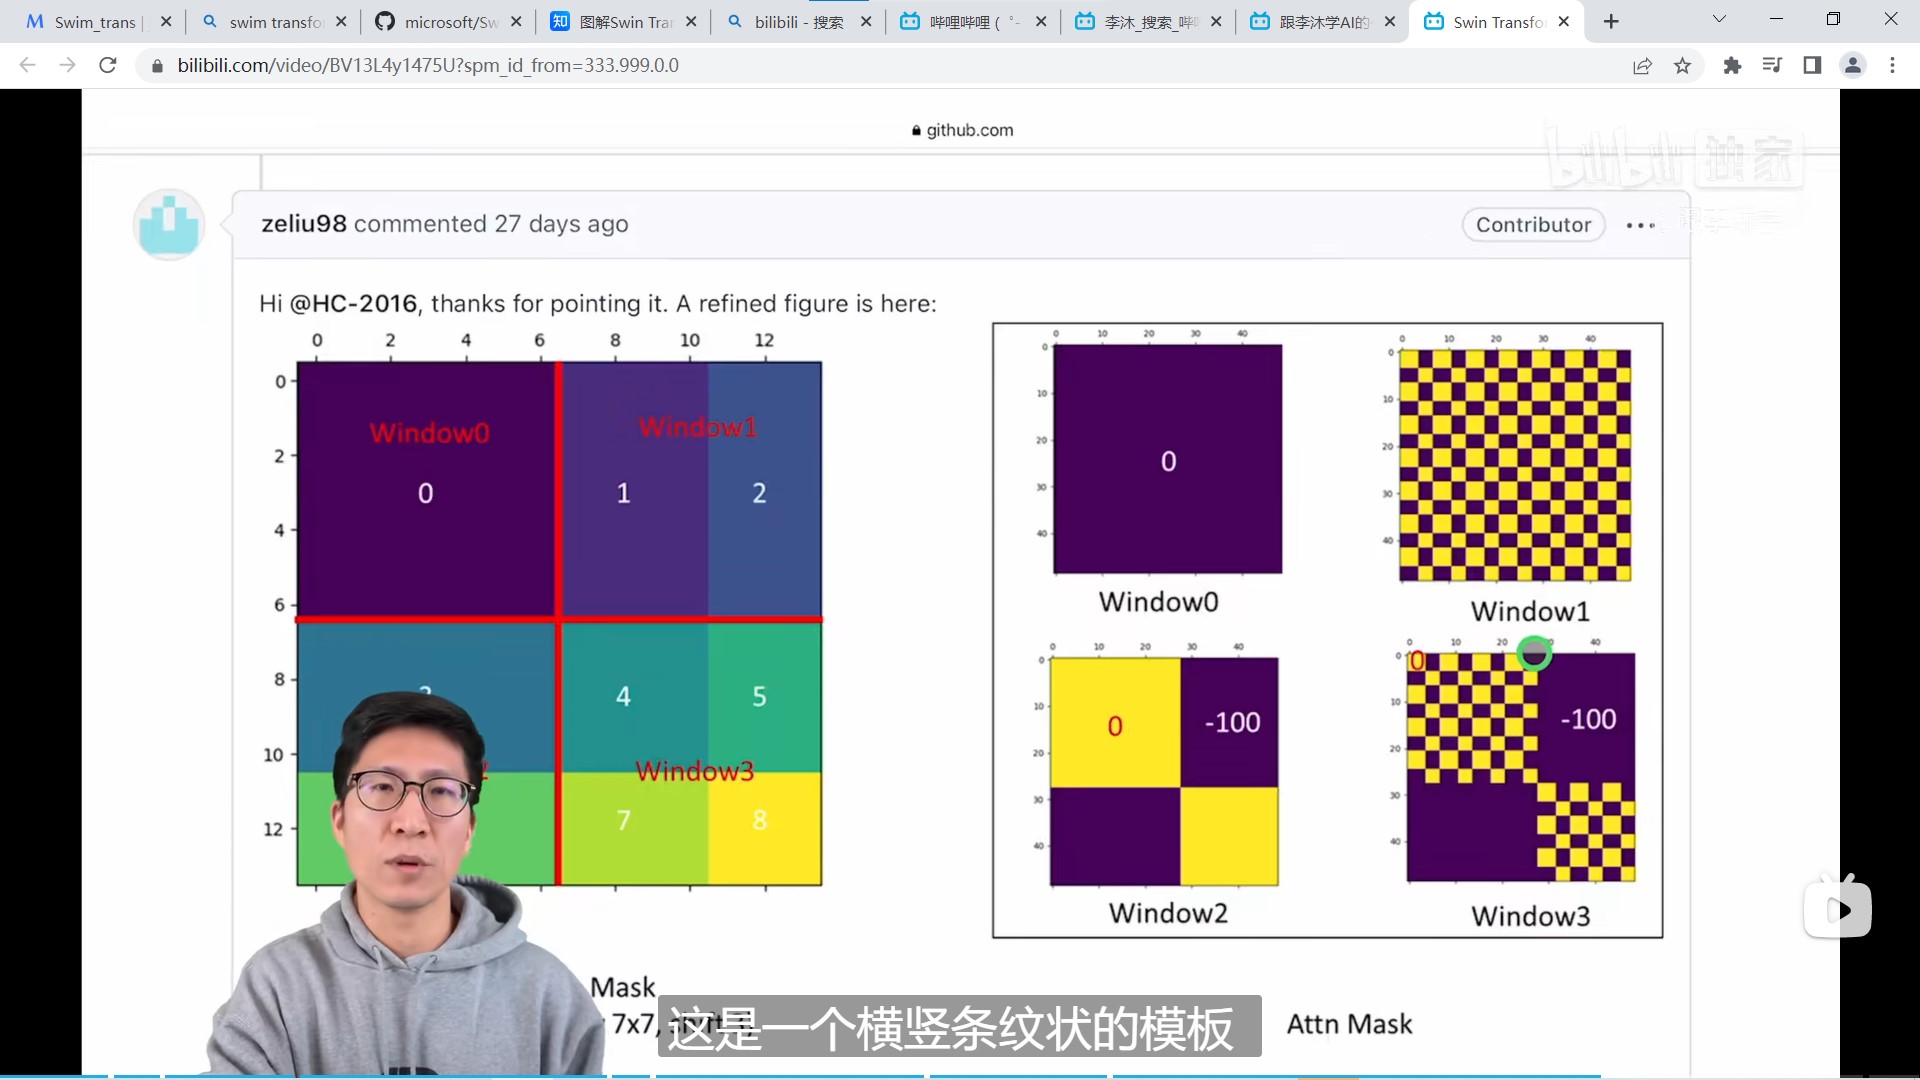
mask的可视化如下所示: 屏幕截图 2022-04-08 110722.jpg◎ 图六 mask的可视化

Patch Merging

屏幕截图 2022-04-08 103557.jpg◎ 图七 Patch Merging示意图1

如上图,Patch Merging会在每个stage开始时调整特征图分辨率,改变特征图的通道数,由于Swin Transformer Block不改变向量的通道数和特征图分辨率,这两者的改变都由Patch Merging实现。Patch Merging的做法时在行方向和列方向上,间隔2选取元素,然后拼接在一起作为一整个张量,最后展开。此时通道维度会变成原先的4倍(因为H,W各缩小2倍),此时再通过一个全连接层再调整通道维度为原来的两倍。

屏幕截图 2022-04-08 180850.jpg◎ 图八 Patch Merging示意图2

相对位置编码

对于一个大小是$Wh \times Ww$的窗口,每个patch的横坐标到其他patch的横坐标的距离(偏移)的取值范围是$(-(Wh-1), (Wh-1))$,每个patch的纵坐标到其他patch的纵坐标的距离(偏移)的取值范围是$(-(Ww-1), (Ww-1))$,分别把取值调整为$(0, (2 \times Wh-1))$,$(0, (2 \times Ww-1))$,故作者维持一个大小是$(2Wh-1) \times (2Ww-1)$的偏置矩阵$\hat{B}$(relative_position_bias_table),该偏置矩阵是一个可学习参数组成的二维矩阵。对于一个$Wh \times Ww$的窗口,需要得到每个patch到其他patch的相对位置编码,方法是计算一个相对坐标矩阵(relative_coords),该矩阵的维度是$(Wh * Ww)\times(Wh * Ww)$,如下图所示,最终每个位置的相对位置编码根据relative_coords的值当作索引从relative_position_bias_table中取得。关于相对位置编码可以结合下文的代码理解。

屏幕截图 2022-04-12 105914.jpg◎ 图九 相对位置编码

代码结构

首先从model = build_model(config)进入模型构建的代码:

1
2
3
4
5
6
    if model_type == 'swin':
        model = SwinTransformer(cfg
        ...)
    elif model_type == 'swin_mlp':
        model = SwinMLP(cfg
        ...)

这里我们关注SwinTransformer的构建,swin_mlpSwinTransformer中的Swin Transformer Block改为了mlp实现。

我们看SwinTransformerforward函数:

 1
 2
 3
 4
 5
 6
 7
 8
 9
10
11
12
13
14
15
16
17
18
19
    def forward_features(self, x):
        x = self.patch_embed(x)
        if self.ape:
            x = x + self.absolute_pos_embed
        x = self.pos_drop(x)

        for layer in self.layers:
            x = layer(x)

        x = self.norm(x)  # B L C
        x = self.avgpool(x.transpose(1, 2))  # B C 1
        x = torch.flatten(x, 1) # B C
        return x

    def forward(self, x):
        x = self.forward_features(x)
        # 分类头 self.head = nn.Linear(self.num_features,num_classes)
        x = self.head(x)
        return x

其中在forward_features函数中,特征x首先经过patch_embed,然后依次经过SwinTransformerlayer:

1
2
for layer in self.layers:
	x = layer(x)

最后是送进分类头之前将特征reshape成$B \times C$的维度:

1
2
3
x = self.norm(x)  # B L C
x = self.avgpool(x.transpose(1, 2))  # B C 1
x = torch.flatten(x, 1) # B C

在这里再次贴上Swim Transformer的网络结构图(Swim-T):

swim_transformer_network.jpg◎ 图十 Swin Transformer (Swin-T) 的网络结构

代码中patch_embed其实做了结构图中的Patch PartitionLinear Embedding的工作:

 1
 2
 3
 4
 5
 6
 7
 8
 9
10
11
12
13
14
15
16
17
18
19
20
21
22
23
24
25
26
27
28
29
30
31
32
class PatchEmbed(nn.Module):
    def __init__(self, img_size=224, patch_size=4, in_chans=3, embed_dim=96, norm_layer=None):
        super().__init__()
        img_size = to_2tuple(img_size)
        patch_size = to_2tuple(patch_size)
        patches_resolution = [img_size[0] // patch_size[0], img_size[1] // patch_size[1]]
        self.img_size = img_size
        self.patch_size = patch_size
        self.patches_resolution = patches_resolution
        self.num_patches = patches_resolution[0] * patches_resolution[1]

        self.in_chans = in_chans
        self.embed_dim = embed_dim
        # 论文中的Patch Partition,卷积核是patch_size(4*4), stride是4
        # 注意这里顺便把论文中的Linear Embedding也做了,输出维度是96而不是48
        self.proj = nn.Conv2d(in_chans, embed_dim, kernel_size=patch_size, stride=patch_size)
        if norm_layer is not None:
            self.norm = norm_layer(embed_dim)
        else:
            self.norm = None

    def forward(self, x):
        B, C, H, W = x.shape
        # FIXME look at relaxing size constraints
        assert H == self.img_size[0] and W == self.img_size[1], \
            f"Input image size ({H}*{W}) doesn't match model ({self.img_size[0]}*{self.img_size[1]})."
        x = self.proj(x).flatten(2).transpose(1, 2)  # B Ph*Pw C
        if self.norm is not None:
            x = self.norm(x)
        return x

    ...

再看self.layers:

 1
 2
 3
 4
 5
 6
 7
 8
 9
10
11
12
13
14
15
16
17
# build layers
self.layers = nn.ModuleList()
for i_layer in range(self.num_layers):
    layer = BasicLayer(dim=int(embed_dim * 2 ** i_layer),
                       input_resolution=(patches_resolution[0] // (2 ** i_layer),
                                         patches_resolution[1] // (2 ** i_layer)),
                       depth=depths[i_layer],
                       num_heads=num_heads[i_layer],
                       window_size=window_size,
                       mlp_ratio=self.mlp_ratio,
                       qkv_bias=qkv_bias, qk_scale=qk_scale,
                       drop=drop_rate, attn_drop=attn_drop_rate,
                       drop_path=dpr[sum(depths[:i_layer]):sum(depths[:i_layer + 1])],
                       norm_layer=norm_layer,
                       downsample=PatchMerging if (i_layer < self.num_layers - 1) else None,
                       use_checkpoint=use_checkpoint)
    self.layers.append(layer)

代码中downsample=PatchMerging if (i_layer < self.num_layers - 1) else None,除了最后一层,前面每一层都添加downsample,也即上图中的Patch Merging操作。我们再看BasicLayer,它主要由SwinTransformerBlockdownsample组成(除了最后一层)。

 1
 2
 3
 4
 5
 6
 7
 8
 9
10
11
12
13
14
15
16
17
18
19
20
21
22
23
24
25
26
27
28
29
30
31
32
33
34
35
36
37
38
39
40
class BasicLayer(nn.Module):
    def __init__(self, dim, input_resolution, depth, num_heads, window_size,
                 mlp_ratio=4., qkv_bias=True, qk_scale=None, drop=0., attn_drop=0.,
                 drop_path=0., norm_layer=nn.LayerNorm, downsample=None, use_checkpoint=False):

        super().__init__()
        self.dim = dim
        self.input_resolution = input_resolution
        self.depth = depth
        self.use_checkpoint = use_checkpoint

        # build blocks
        self.blocks = nn.ModuleList([
            SwinTransformerBlock(dim=dim, input_resolution=input_resolution,
                                 num_heads=num_heads, window_size=window_size,
                                 shift_size=0 if (i % 2 == 0) else window_size // 2,
                                 mlp_ratio=mlp_ratio,
                                 qkv_bias=qkv_bias, qk_scale=qk_scale,
                                 drop=drop, attn_drop=attn_drop,
                                 drop_path=drop_path[i] if isinstance(drop_path, list) else drop_path,
                                 norm_layer=norm_layer)
            for i in range(depth)])

        # patch merging layer
        # 经过patch merging layer之后特征图分辨率讲到1/4,通道数提升2倍(不是4倍)
        if downsample is not None:
            self.downsample = downsample(input_resolution, dim=dim, norm_layer=norm_layer)
        else:
            self.downsample = None
    #这里是先经过len(depth)次SwinTransformerBlock再做patch merging,所以最后一层没有patch merging,和论文的示意图稍微不同
    def forward(self, x):
        for blk in self.blocks:
            if self.use_checkpoint:
                x = checkpoint.checkpoint(blk, x)
            else:
                x = blk(x)
        if self.downsample is not None:
            x = self.downsample(x)
        return x
        ...

重点看SwinTransformerBlock:

  1
  2
  3
  4
  5
  6
  7
  8
  9
 10
 11
 12
 13
 14
 15
 16
 17
 18
 19
 20
 21
 22
 23
 24
 25
 26
 27
 28
 29
 30
 31
 32
 33
 34
 35
 36
 37
 38
 39
 40
 41
 42
 43
 44
 45
 46
 47
 48
 49
 50
 51
 52
 53
 54
 55
 56
 57
 58
 59
 60
 61
 62
 63
 64
 65
 66
 67
 68
 69
 70
 71
 72
 73
 74
 75
 76
 77
 78
 79
 80
 81
 82
 83
 84
 85
 86
 87
 88
 89
 90
 91
 92
 93
 94
 95
 96
 97
 98
 99
100
101
102
class SwinTransformerBlock(nn.Module):
    def __init__(self, dim, input_resolution, num_heads, window_size=7, shift_size=0,
                 mlp_ratio=4., qkv_bias=True, qk_scale=None, drop=0., attn_drop=0., drop_path=0.,
                 act_layer=nn.GELU, norm_layer=nn.LayerNorm):
        super().__init__()
        self.dim = dim
        self.input_resolution = input_resolution
        self.num_heads = num_heads
        self.window_size = window_size
        self.shift_size = shift_size
        self.mlp_ratio = mlp_ratio
        if min(self.input_resolution) <= self.window_size:
            # if window size is larger than input resolution, we don't partition windows
            self.shift_size = 0
            self.window_size = min(self.input_resolution)
        assert 0 <= self.shift_size < self.window_size, "shift_size must in 0-window_size"

        self.norm1 = norm_layer(dim)
        self.attn = WindowAttention(
            dim, window_size=to_2tuple(self.window_size), num_heads=num_heads,
            qkv_bias=qkv_bias, qk_scale=qk_scale, attn_drop=attn_drop, proj_drop=drop)
        #在进行残差连接之前,丢弃了一部分的参数
        self.drop_path = DropPath(drop_path) if drop_path > 0. else nn.Identity()
        self.norm2 = norm_layer(dim)
        mlp_hidden_dim = int(dim * mlp_ratio)
        self.mlp = Mlp(in_features=dim, hidden_features=mlp_hidden_dim, act_layer=act_layer, drop=drop)

        if self.shift_size > 0:
            # calculate attention mask for SW-MSA
            H, W = self.input_resolution
            img_mask = torch.zeros((1, H, W, 1))  # 1 H W 1
            #列表切片
            h_slices = (slice(0, -self.window_size),
                        slice(-self.window_size, -self.shift_size),
                        slice(-self.shift_size, None))
            w_slices = (slice(0, -self.window_size),
                        slice(-self.window_size, -self.shift_size),
                        slice(-self.shift_size, None))
            #做好标记(0到8)
            cnt = 0
            for h in h_slices:
                for w in w_slices:
                    img_mask[:, h, w, :] = cnt
                    cnt += 1
            #划分方式仍然按照(B, H, W, C)-->(num_windows*B, window_size, window_size, C)的方式划分
            mask_windows = window_partition(img_mask, self.window_size)  # nW, window_size, window_size, 1
            mask_windows = mask_windows.view(-1, self.window_size * self.window_size)
            #广播相减,得到的attn_mask,下面是第一个mask_windows的维度
            # mask_windows.unsqueeze(1): torch.Size([64, 1, 49])
            # mask_windows.unsqueeze(2): torch.Size([64, 49, 1])
            # attn_mask: torch.Size([64, 49, 49])
            #相当于拿每个元素与self.window_size * self.window_size的张量进行广播减,非零的地方填充-100.0
            attn_mask = mask_windows.unsqueeze(1) - mask_windows.unsqueeze(2)
            attn_mask = attn_mask.masked_fill(attn_mask != 0, float(-100.0)).masked_fill(attn_mask == 0, float(0.0))
        else:
            attn_mask = None
        # mask作为一个常量数据存在
        self.register_buffer("attn_mask", attn_mask)

    def forward(self, x):
        H, W = self.input_resolution
        B, L, C = x.shape
        assert L == H * W, "input feature has wrong size"

        shortcut = x
        x = self.norm1(x)
        x = x.view(B, H, W, C)

        # cyclic shift
        # 用二维张量举例子,torch.roll(input, shifts, dims=None)的意思是将行向量(dims==0)的第一行移动到shifts的位置,
        # 或者将列向量(dims==1)的第一列移动到shifts的位置,
        # 把张量想象成一个循环数组,为了将目标向量移动到目标位置,需要将其他的向量依次循环滚动
        # 如果shifts和dims是列表,则按顺序依次滚动,比如下面的代码,先执行shifts=-self.shift_size, dims=1,再执行shifts=-self.shift_size, dims=2
        if self.shift_size > 0:
            shifted_x = torch.roll(x, shifts=(-self.shift_size, -self.shift_size), dims=(1, 2))
        else:
            shifted_x = x

        # partition windows
        x_windows = window_partition(shifted_x, self.window_size)  # nW*B, window_size, window_size, C
        x_windows = x_windows.view(-1, self.window_size * self.window_size, C)  # nW*B, window_size*window_size, C

        # W-MSA/SW-MSA
        attn_windows = self.attn(x_windows, mask=self.attn_mask)  # nW*B, window_size*window_size, C

        # merge windows
        attn_windows = attn_windows.view(-1, self.window_size, self.window_size, C)
        shifted_x = window_reverse(attn_windows, self.window_size, H, W)  # B H' W' C

        # reverse cyclic shift
        # 如果不做reverse,自注意力的计算会一直往图像右下角偏移
        if self.shift_size > 0:
            x = torch.roll(shifted_x, shifts=(self.shift_size, self.shift_size), dims=(1, 2))
        else:
            x = shifted_x
        x = x.view(B, H * W, C)

        # FFN
        x = shortcut + self.drop_path(x)
        x = x + self.drop_path(self.mlp(self.norm2(x)))

        return x

SwinTransformerBlock类处理带有Shifted windows的自注意力计算和正常windows的自注意力计算。SwinTransformerBlock首先会对特征进行窗口划分partition windows,计算完窗口注意力后再做窗口合并merge windows

 1
 2
 3
 4
 5
 6
 7
 8
 9
10
11
12
13
14
15
16
17
18
19
20
21
22
23
24
25
26
27
28
29
30
31
32
33
34
35
36
37
38
39
40
# partition windows
x_windows = window_partition(shifted_x, self.window_size)  # nW*B, window_size, window_size, C
x_windows = x_windows.view(-1, self.window_size * self.window_size, C)  # nW*B, window_size*window_size, C
...
# merge windows
attn_windows = attn_windows.view(-1, self.window_size, self.window_size, C)
shifted_x = window_reverse(attn_windows, self.window_size, H, W)  # B H' W' C
...

def window_partition(x, window_size):
    """
    Args:
        x: (B, H, W, C)
        window_size (int): window size

    Returns:
        windows: (num_windows*B, window_size, window_size, C)
    """
    B, H, W, C = x.shape
    x = x.view(B, H // window_size, window_size, W // window_size, window_size, C)
    # .permute()交换维度顺序,.contiguous()保证内存上的连续
    windows = x.permute(0, 1, 3, 2, 4, 5).contiguous().view(-1, window_size, window_size, C)
    return windows


def window_reverse(windows, window_size, H, W):
    """
    Args:
        windows: (num_windows*B, window_size, window_size, C)
        window_size (int): Window size
        H (int): Height of image
        W (int): Width of image

    Returns:
        x: (B, H, W, C)
    """
    B = int(windows.shape[0] / (H * W / window_size / window_size))
    x = windows.view(B, H // window_size, W // window_size, window_size, window_size, -1)
    x = x.permute(0, 1, 3, 2, 4, 5).contiguous().view(B, H, W, -1)
    return x

这里的重点代码在于中间的窗口注意力WindowAttention的计算过程:

1
2
3
4
5
6
self.attn = WindowAttention(
            dim, window_size=to_2tuple(self.window_size), num_heads=num_heads,
            qkv_bias=qkv_bias, qk_scale=qk_scale, attn_drop=attn_drop, proj_drop=drop)
...
`# W-MSA/SW-MSA
attn_windows = self.attn(x_windows, mask=self.attn_mask)  # nW*B, window_size*window_size, C`

WindowAttention部分代码如下:

 1
 2
 3
 4
 5
 6
 7
 8
 9
10
11
12
13
14
15
16
17
18
19
20
21
22
23
24
25
26
27
28
29
30
31
32
33
34
35
36
37
38
39
40
41
42
43
44
45
46
47
48
49
50
51
52
53
54
55
56
57
58
59
60
61
62
63
64
65
66
67
68
69
70
71
72
73
74
75
class WindowAttention(nn.Module):
    def __init__(self, dim, window_size, num_heads, qkv_bias=True, qk_scale=None, attn_drop=0., proj_drop=0.):

        super().__init__()
        self.dim = dim
        self.window_size = window_size  # Wh, Ww
        self.num_heads = num_heads
        head_dim = dim // num_heads
        self.scale = qk_scale or head_dim ** -0.5

        # define a parameter table of relative position bias
        # 相对位置编码
        self.relative_position_bias_table = nn.Parameter(
            torch.zeros((2 * window_size[0] - 1) * (2 * window_size[1] - 1), num_heads))  # 2*Wh-1 * 2*Ww-1, nH

        # get pair-wise relative position index for each token inside the window
        coords_h = torch.arange(self.window_size[0])
        coords_w = torch.arange(self.window_size[1])
        coords = torch.stack(torch.meshgrid([coords_h, coords_w]))  # 2, Wh, Ww
        coords_flatten = torch.flatten(coords, 1)  # 2, Wh*Ww
        # 广播相减 2, Wh*Ww --> 2, Wh*Ww, Wh*Ww
        # 一共Wh*Ww行,每一行代表一个坐标到其他Wh*Ww个坐标的差值
        relative_coords = coords_flatten[:, :, None] - coords_flatten[:, None, :]  # 2, Wh*Ww, Wh*Ww
        relative_coords = relative_coords.permute(1, 2, 0).contiguous()  # Wh*Ww, Wh*Ww, 2
        relative_coords[:, :, 0] += self.window_size[0] - 1  # shift to start from 0 # 此时值从-(Wh-1)~(Wh-1) --> 0~(2*Wh-1)
        relative_coords[:, :, 1] += self.window_size[1] - 1  # 此时值从-(Ww-1)~(Ww-1) --> 0~(2*Ww-1)
        # 把relative_coords的第一个维度乘以(2*Ww-1)
        relative_coords[:, :, 0] *= 2 * self.window_size[1] - 1 #
        relative_position_index = relative_coords.sum(-1)  # Wh*Ww, Wh*Ww
        self.register_buffer("relative_position_index", relative_position_index)

        self.qkv = nn.Linear(dim, dim * 3, bias=qkv_bias)
        self.attn_drop = nn.Dropout(attn_drop)
        self.proj = nn.Linear(dim, dim)
        self.proj_drop = nn.Dropout(proj_drop)

        trunc_normal_(self.relative_position_bias_table, std=.02)
        self.softmax = nn.Softmax(dim=-1)

    def forward(self, x, mask=None):
        """
        Args:
            x: input features with shape of (num_windows*B, N, C)
            mask: (0/-inf) mask with shape of (num_windows, Wh*Ww, Wh*Ww) or None
        """
        B_, N, C = x.shape
        qkv = self.qkv(x).reshape(B_, N, 3, self.num_heads, C // self.num_heads).permute(2, 0, 3, 1, 4)
        q, k, v = qkv[0], qkv[1], qkv[2]  # make torchscript happy (cannot use tensor as tuple)

        q = q * self.scale
        attn = (q @ k.transpose(-2, -1))
        # 虽然relative_position_index的大小是Wh*Ww, Wh*Ww,但其值域在(2*Wh-1)*(2*Ww-1),所以维护一个(2*Wh-1)*(2*Ww-1)的table即可
        # 意思是如果relative_position_index中相同的值,应该从relative_position_bias_table相同位置取值,这是相对位置编码的意思
        relative_position_bias = self.relative_position_bias_table[self.relative_position_index.view(-1)].view(
            self.window_size[0] * self.window_size[1], self.window_size[0] * self.window_size[1], -1)  # Wh*Ww,Wh*Ww,nH
        relative_position_bias = relative_position_bias.permute(2, 0, 1).contiguous()  # nH, Wh*Ww, Wh*Ww
        # 广播加
        attn = attn + relative_position_bias.unsqueeze(0)
        # SW-MSA
        if mask is not None:
            nW = mask.shape[0]
            attn = attn.view(B_ // nW, nW, self.num_heads, N, N) + mask.unsqueeze(1).unsqueeze(0)
            attn = attn.view(-1, self.num_heads, N, N)
            attn = self.softmax(attn)
        # W-MSA
        else:
            attn = self.softmax(attn)

        attn = self.attn_drop(attn)

        x = (attn @ v).transpose(1, 2).reshape(B_, N, C)
        x = self.proj(x)
        x = self.proj_drop(x)
        return x
        ...

关于相对位置编码,代码中维护一个relative_position_bias_tablerelative_coords,每个windows的相对位置编码relative_position_bias从中取值:

1
2
3
4
5
6
relative_position_bias = self.relative_position_bias_table[self.relative_position_index.view(-1)].view(
            self.window_size[0] * self.window_size[1], self.window_size[0] * self.window_size[1], -1) # Wh*Ww,Wh*Ww,nH

relative_position_bias = relative_position_bias.permute(2, 0, 1).contiguous()  # nH, Wh*Ww, Wh*Ww
# 广播加       
attn = attn + relative_position_bias.unsqueeze(0)

对于SW-MSA,它比W-MSA多了一个cyclic shiftmask操作,cyclic shift的操作之后还有reverse cyclic shift操作,防止自注意力的计算会一直往图像右下角偏移:

 1
 2
 3
 4
 5
 6
 7
 8
 9
10
11
12
13
14
15
16
# cyclic shift
# 用二维张量举例子,torch.roll(input, shifts, dims=None)的意思是将行向量(dims==0)的第一行移动到shifts的位置,
# 或者将列向量(dims==1)的第一列移动到shifts的位置,
# 把张量想象成一个循环数组,为了将目标向量移动到目标位置,需要将其他的向量依次循环滚动
# 如果shifts和dims是列表,则按顺序依次滚动,比如下面的代码,先执行shifts=-self.shift_size, dims=1,再执行shifts=-self.shift_size, dims=2
if self.shift_size > 0:
    shifted_x = torch.roll(x, shifts=(-self.shift_size, -self.shift_size), dims=(1, 2))
else:
    shifted_x = x
...
# reverse cyclic shift
# 如果不做reverse,自注意力的计算会一直往图像右下角偏移
if self.shift_size > 0:
    x = torch.roll(shifted_x, shifts=(self.shift_size, self.shift_size), dims=(1, 2))
else:
    x = shifted_x

mask的生成代码如下:

 1
 2
 3
 4
 5
 6
 7
 8
 9
10
11
12
13
14
15
16
17
18
19
20
21
22
23
24
25
26
27
28
29
30
31
if self.shift_size > 0:
    # calculate attention mask for SW-MSA
    H, W = self.input_resolution
    img_mask = torch.zeros((1, H, W, 1))  # 1 H W 1
    #列表切片
    h_slices = (slice(0, -self.window_size),
                slice(-self.window_size, -self.shift_size),
                slice(-self.shift_size, None))
    w_slices = (slice(0, -self.window_size),
                slice(-self.window_size, -self.shift_size),
                slice(-self.shift_size, None))
    #做好标记(0到8)
    cnt = 0
    for h in h_slices:
        for w in w_slices:
            img_mask[:, h, w, :] = cnt
            cnt += 1
    #划分方式仍然按照(B, H, W, C)-->(num_windows*B, window_size, window_size, C)的方式划分
    mask_windows = window_partition(img_mask, self.window_size)  # nW, window_size, window_size, 1
    mask_windows = mask_windows.view(-1, self.window_size * self.window_size)
    #广播相减,得到的attn_mask,下面是第一个mask_windows的维度
    # mask_windows.unsqueeze(1): torch.Size([64, 1, 49])
    # mask_windows.unsqueeze(2): torch.Size([64, 49, 1])
    # attn_mask: torch.Size([64, 49, 49])
    #相当于拿每个元素与self.window_size * self.window_size的张量进行广播减,非零的地方填充-100.0
    attn_mask = mask_windows.unsqueeze(1) - mask_windows.unsqueeze(2)
    attn_mask = attn_mask.masked_fill(attn_mask != 0, float(-100.0)).masked_fill(attn_mask == 0, float(0.0))
else:
    attn_mask = None
# mask作为一个常量数据存在
self.register_buffer("attn_mask", attn_mask)

attn_mask作为一个常量数据被注册。这样SwinTransformerBlock就走完了,对于一个BasicLayer,在SwinTransformerBlock之后还有downsample层,它负责将特征图降采样并提升通道维数:

 1
 2
 3
 4
 5
 6
 7
 8
 9
10
11
12
13
14
15
16
17
18
19
20
21
22
23
24
25
26
27
28
29
30
class PatchMerging(nn.Module):
    def __init__(self, input_resolution, dim, norm_layer=nn.LayerNorm):
        super().__init__()
        self.input_resolution = input_resolution
        self.dim = dim
        self.reduction = nn.Linear(4 * dim, 2 * dim, bias=False)
        self.norm = norm_layer(4 * dim)

    def forward(self, x):
        """
        x: B, H*W, C
        """
        H, W = self.input_resolution
        B, L, C = x.shape
        assert L == H * W, "input feature has wrong size"
        assert H % 2 == 0 and W % 2 == 0, f"x size ({H}*{W}) are not even."

        x = x.view(B, H, W, C)
        # 采样间隔是2
        x0 = x[:, 0::2, 0::2, :]  # B H/2 W/2 C
        x1 = x[:, 1::2, 0::2, :]  # B H/2 W/2 C
        x2 = x[:, 0::2, 1::2, :]  # B H/2 W/2 C
        x3 = x[:, 1::2, 1::2, :]  # B H/2 W/2 C
        x = torch.cat([x0, x1, x2, x3], -1)  # B H/2 W/2 4*C
        x = x.view(B, -1, 4 * C)  # B H/2*W/2 4*C

        x = self.norm(x)
        x = self.reduction(x)

        return x

self.reduction将通道维数从$4C$降到$2C$,这样特征图通过downsample层后,通道维数只提高两倍。

特征图经过多层BasicLayer后,最终被送进分类头,完成整个正向过程。

更多关于Swin Transformer

可以看b站李沐的Swin Transformer论文精读[3],代码讲解看知乎文章图解Swin Transformer[4]

updatedupdated2022-04-162022-04-16